一、准备工作
Gophish是一个开源网络钓鱼工具包
特点是开箱即用,特别适合甲方用来对内部员工进行邮件钓鱼演练。
项目主页:https://getgophish.com/
1、安装
支持Windows/ Mac/Linux平台。下载对应系统版本(https://github.com/gophish/gophish/releases/)的压缩包,运行二进制文件即可。
2、编译安装
Gophish编译安装需要Go v1.10或更高版本!
go get github.com/gophish/gophish

cd ~/.go/src/github.com/gophish/gophish/    [你本机的go项目目录]

go build

./gophish     [运行生成的gophish二进制文件,浏览器访问即可]

https://localhost:3333   [默认用户admin,密码在终端生成]
3、Docker
https://hub.docker.com/r/gophish/gophish/
4、项目文档
http://getgophish.com/documentation
5、问题反馈
https://github.com/gophish/gophish/issues/new
6、免费SSL证书
示例域名:
https://access.a.com

安装ssl证书(letsencrypt):

cd /opt/gophish              # 你的gophish目录
sudo apt install certbot
sudo kill $(pidof gohpish)
sudo certbot certonly -d access.a.com --standalone
ln -s /etc/letsencrypt/live/access.a.com/privkey.pem  access.a.com.key
ln -s /etc/letsencrypt/live/access.a.com/fullchain.pem access.a.com.crt
7、配置文件
# nano config.json

{
        "admin_server": {
                "listen_url": "0.0.0.0:8088",     //修改默认端口
                "use_tls": true,
                "cert_path": "gophish_admin.crt",
                "key_path": "gophish_admin.key"
        },
        "phish_server": {
                "listen_url": "0.0.0.0:443",     //https开启443端口
                "use_tls": true,
                "cert_path": "access.a.com.crt",  //修改证书
                "key_path": "access.a.com.key"    //修改证书
        },
        "db_name": "sqlite3",                     //数据库支持MySQL
        "db_path": "gophish.db",
        "migrations_prefix": "db/db_",
        "contact_address": "",
        "logging": {
                "filename": "/var/log/gophish/gophish.log",  //日志记录,需要先创建目录和文件,否则跑不起来
                "level": ""
        }
}
二、目标人群

模板案例,名字我只用FirstName,后面邮件内容模板用到这个变量FirstName

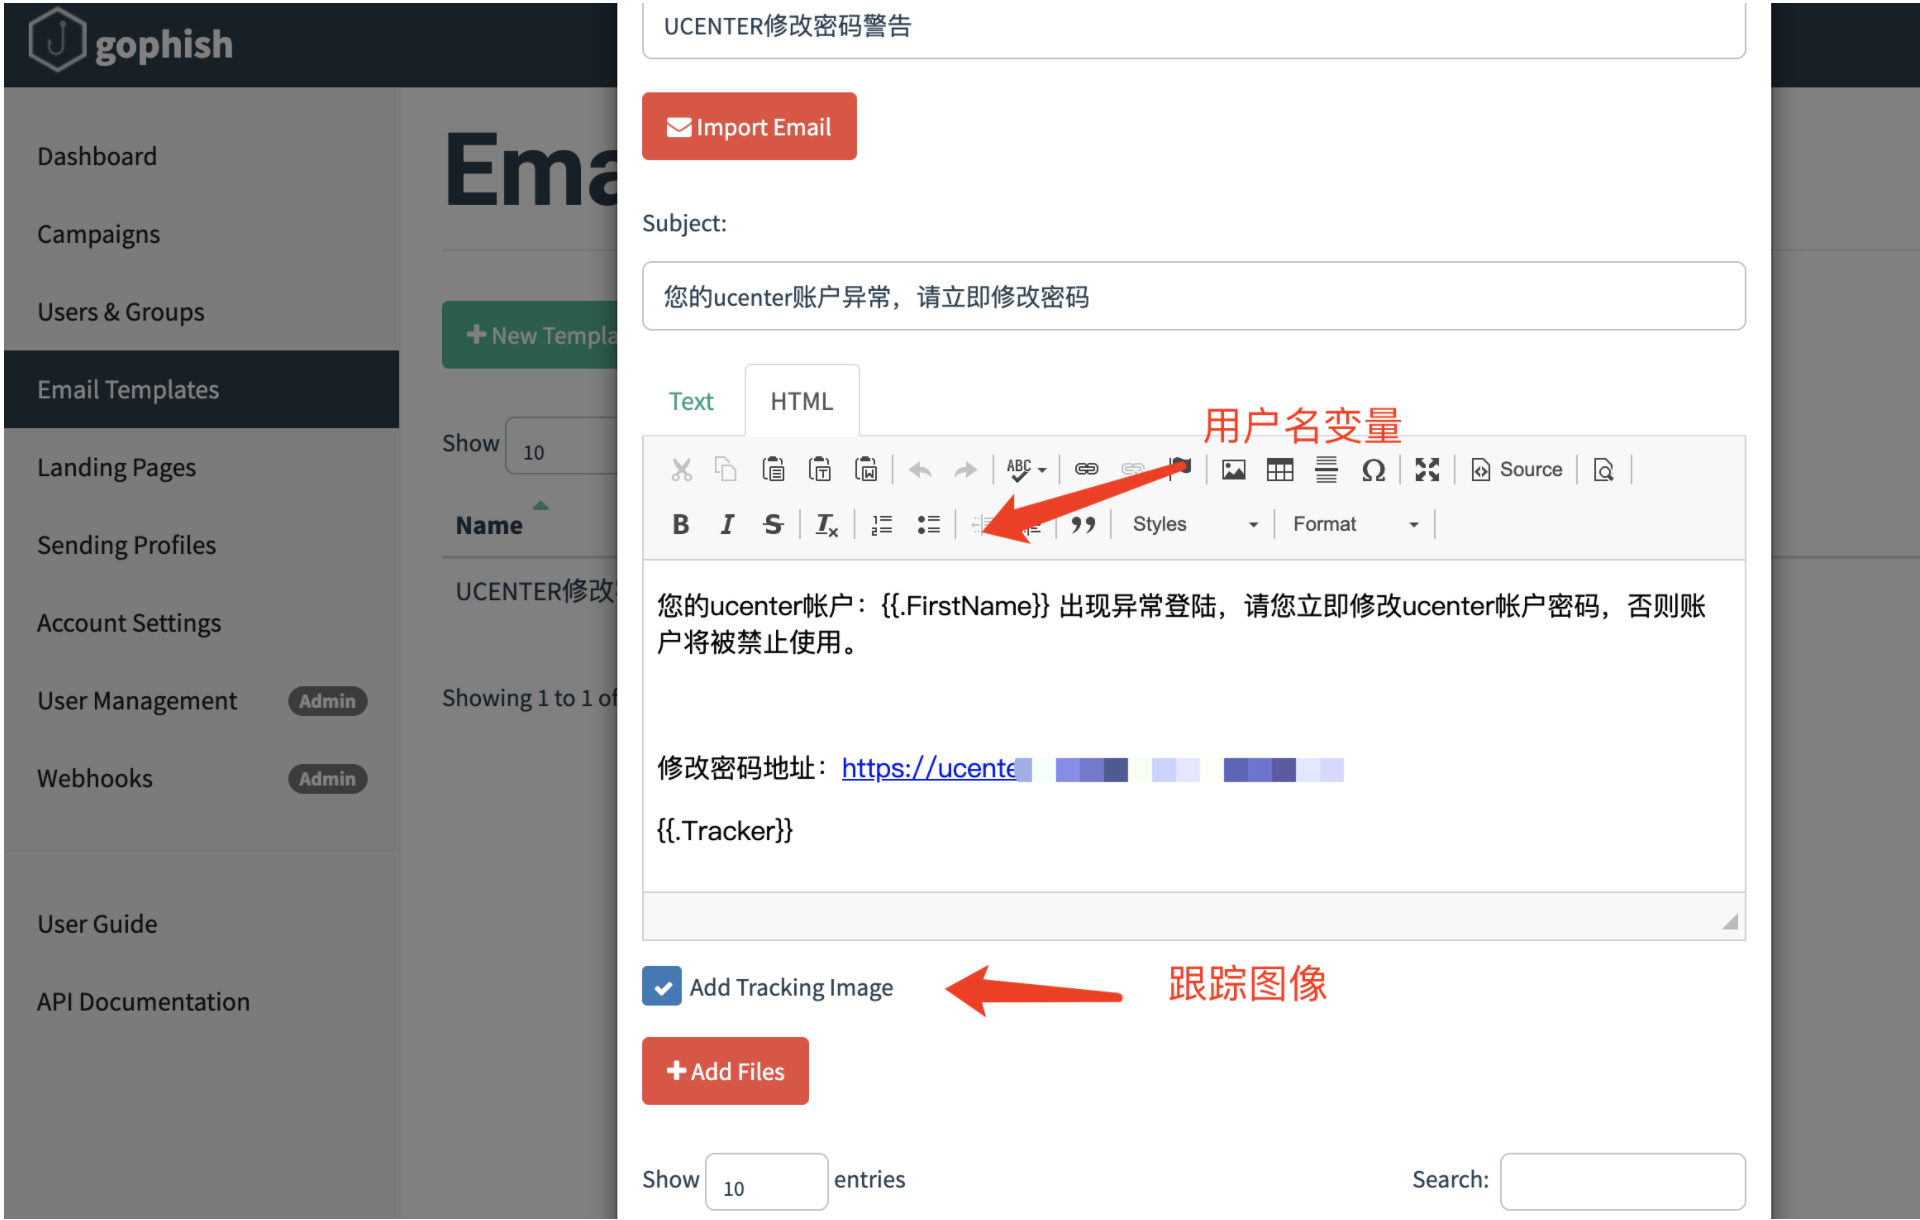
三、邮件内容模板
用户名处插入变量:{{.FirstName}},程序发送邮件的时候会自动插入对应的用户名。
<html>
<head>
<title></title>
</head>
<body>
<p><font style="vertical-align: inherit;"><font style="vertical-align: inherit;"><font style="vertical-align: inherit;"><font style="vertical-align: inherit;"><font style="vertical-align: inherit;"><font style="vertical-align: inherit;">您的ucenter帐户:{{.FirstName}}</font></font></font></font></font></font> 出现异常登陆<font style="vertical-align: inherit;"><font style="vertical-align: inherit;"><font style="vertical-align: inherit;"><font style="vertical-align: inherit;"><font style="vertical-align: inherit;"><font style="vertical-align: inherit;">,请您立即修改ucenter帐户密码,否则账户将被禁止使用。</font></font></font></font></font></font></p>
<p> </p>
<p><font style="vertical-align: inherit;"><font style="vertical-align: inherit;"><font style="vertical-align: inherit;"><font style="vertical-align: inherit;"><font style="vertical-align: inherit;"><font style="vertical-align: inherit;">修改密码地址:</font></font></font></font><a href="{{.URL}}"><font style="vertical-align: inherit;"><font style="vertical-align: inherit;"><font style="vertical-align: inherit;"><font style="vertical-align: inherit;">https://ucenter.test.com</font></font></font></font></a></font></font></p>
<p><font style="vertical-align: inherit;"><font style="vertical-align: inherit;"><font style="vertical-align: inherit;"><font style="vertical-align: inherit;">{{.Tracker}}</font></font></font></font></p>
</body>
</html>
模板变量参考
| Variable | Description |
|---|---|
| {{.RId}} | The target’s unique ID |
| {{.FirstName}} | The target’s first name |
| {{.LastName}} | The target’s last name |
| {{.Position}} | The target’s position |
| {{.Email}} | The target’s email address |
| {{.From}} | The spoofed sender |
| {{.TrackingURL}} | The URL to the tracking handler |
| {{.Tracker}} | An alias for <img src="{{.TrackingURL}}"/> |
| {{.URL}} | The phishing URL |
| {{.BaseURL}} | The base URL with the path and rid parameter stripped. Useful for making links to static files. |
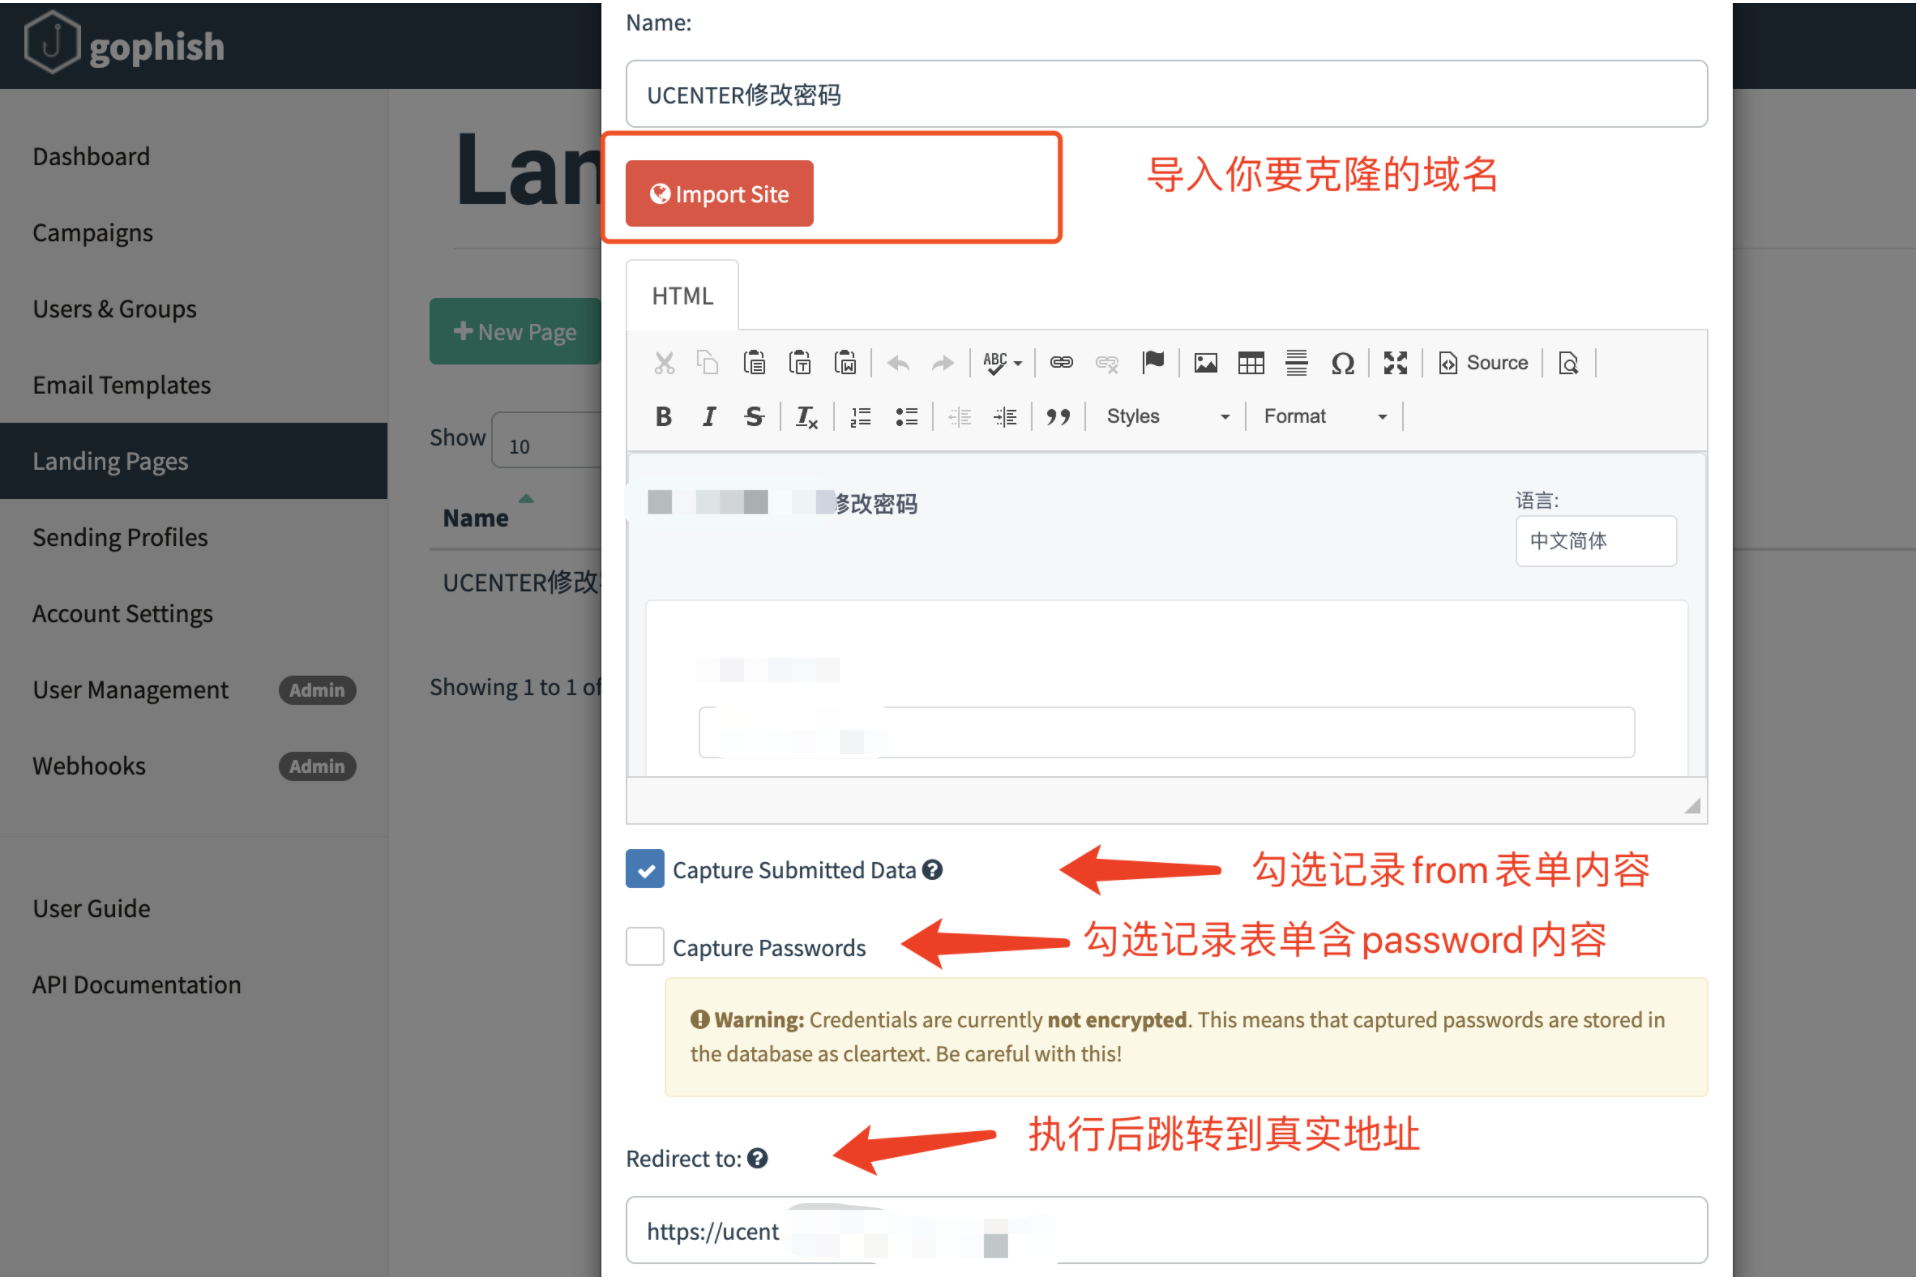
四、登陆页面
注意,目标网站使用了前端框架的话(例如vue)会导致克隆失败,页面无法显示,需要自己保存网站页面并修改HTML代码,VUE框架由于使用js来触发form动作,需要注释并自己添加from代码。
<form action="" autocomplete="off" class="ivu-form ivu-form-label-right" enctype="application/x-www-form-urlencoded" method="post">
示例代码:
<html>
<head>
<title></title>
</head>
<body>
<form action="" method="post" name="form"><label>用户名:</label> <input name="username" type="text" /><br />
<label>密码:</label> <input name="password" type="password" /><br />
<input id="login" name="login" type="submit" value="修改密码" /> </form>
</body>
</html>
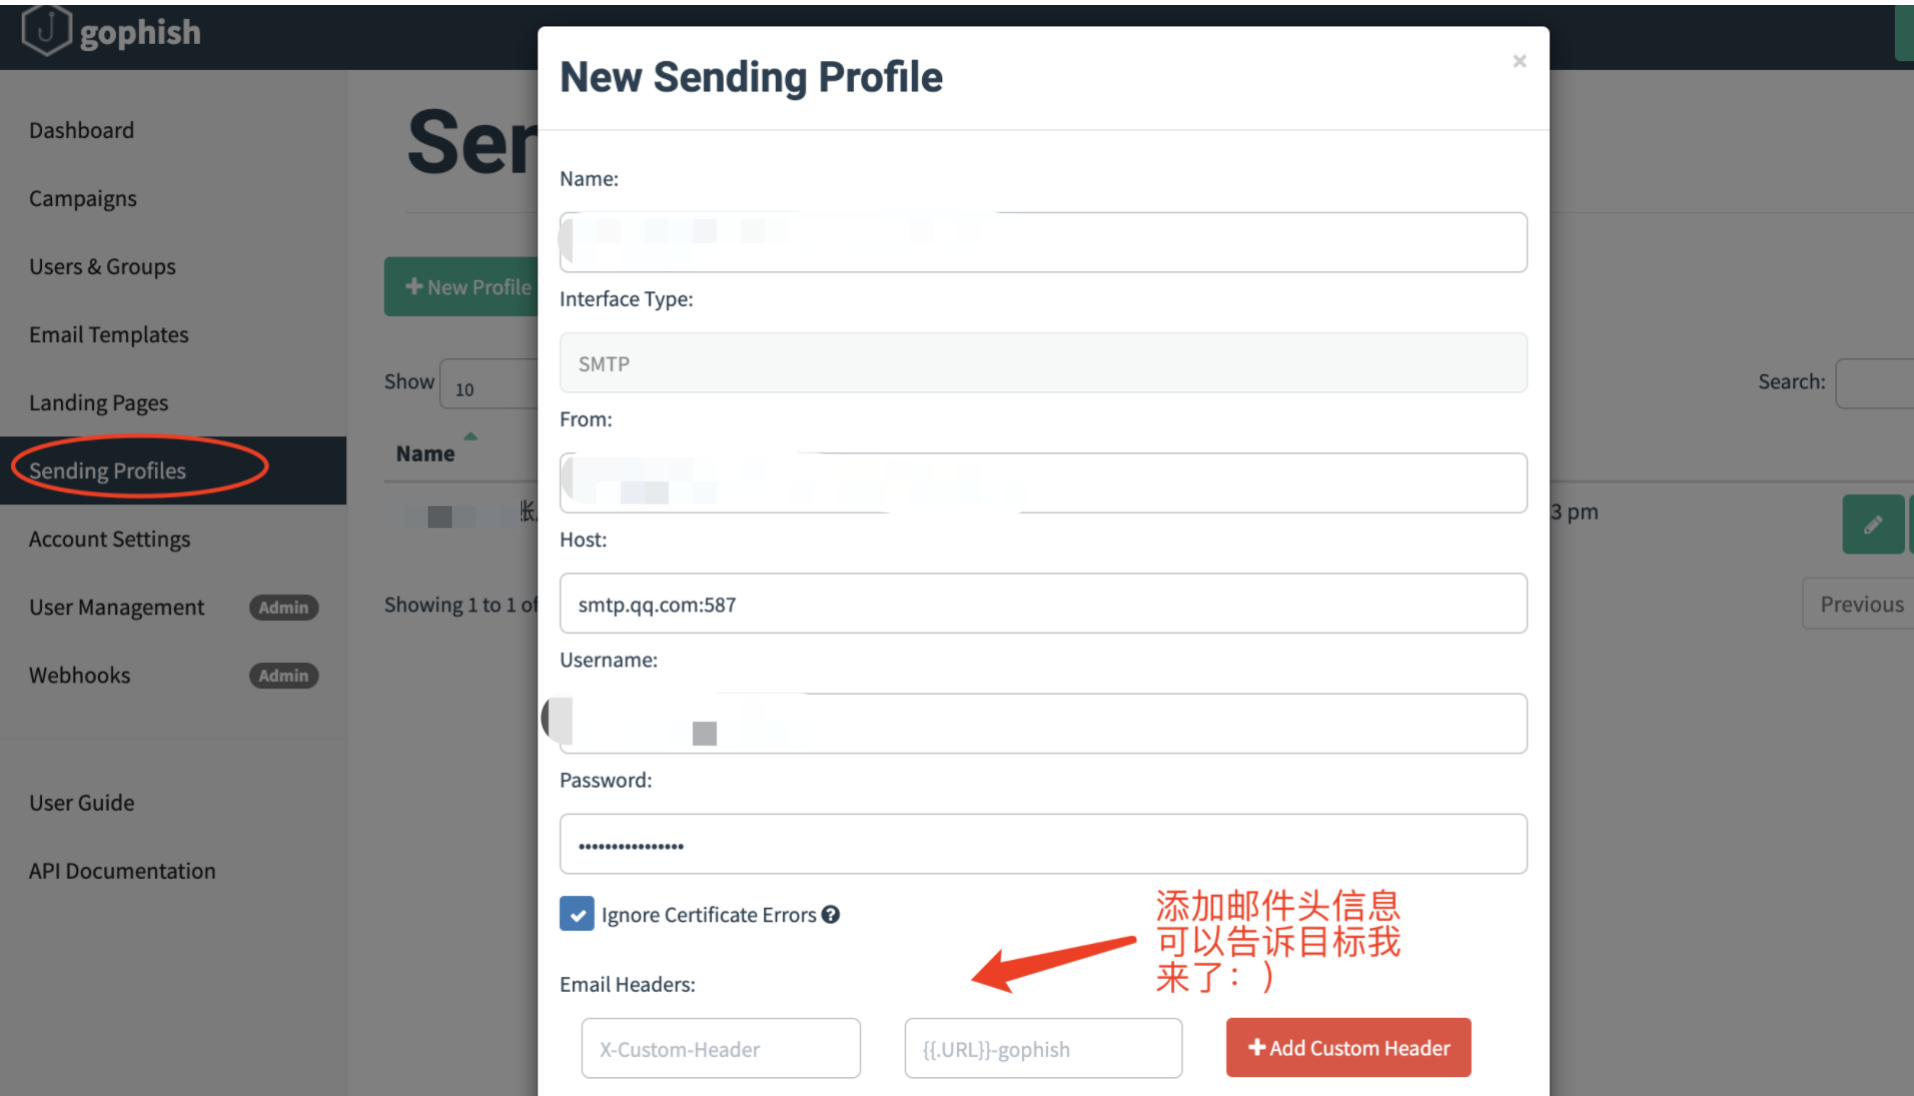
五、邮箱配置
目标使用的是QQ企业邮箱,我这里使用的是QQ域名邮箱,可以直接绕过反垃圾,注意QQ域名邮箱已经下线,目前只有已开通的域名才能使用,而且不能新增成员。
Name:
运维部账号管家<account@test.com>
Interface Type:
运维部账号管家<account@test.com>
Host:
smtp.qq.com:587
Username:
account@test.com
Password:
123456789abc
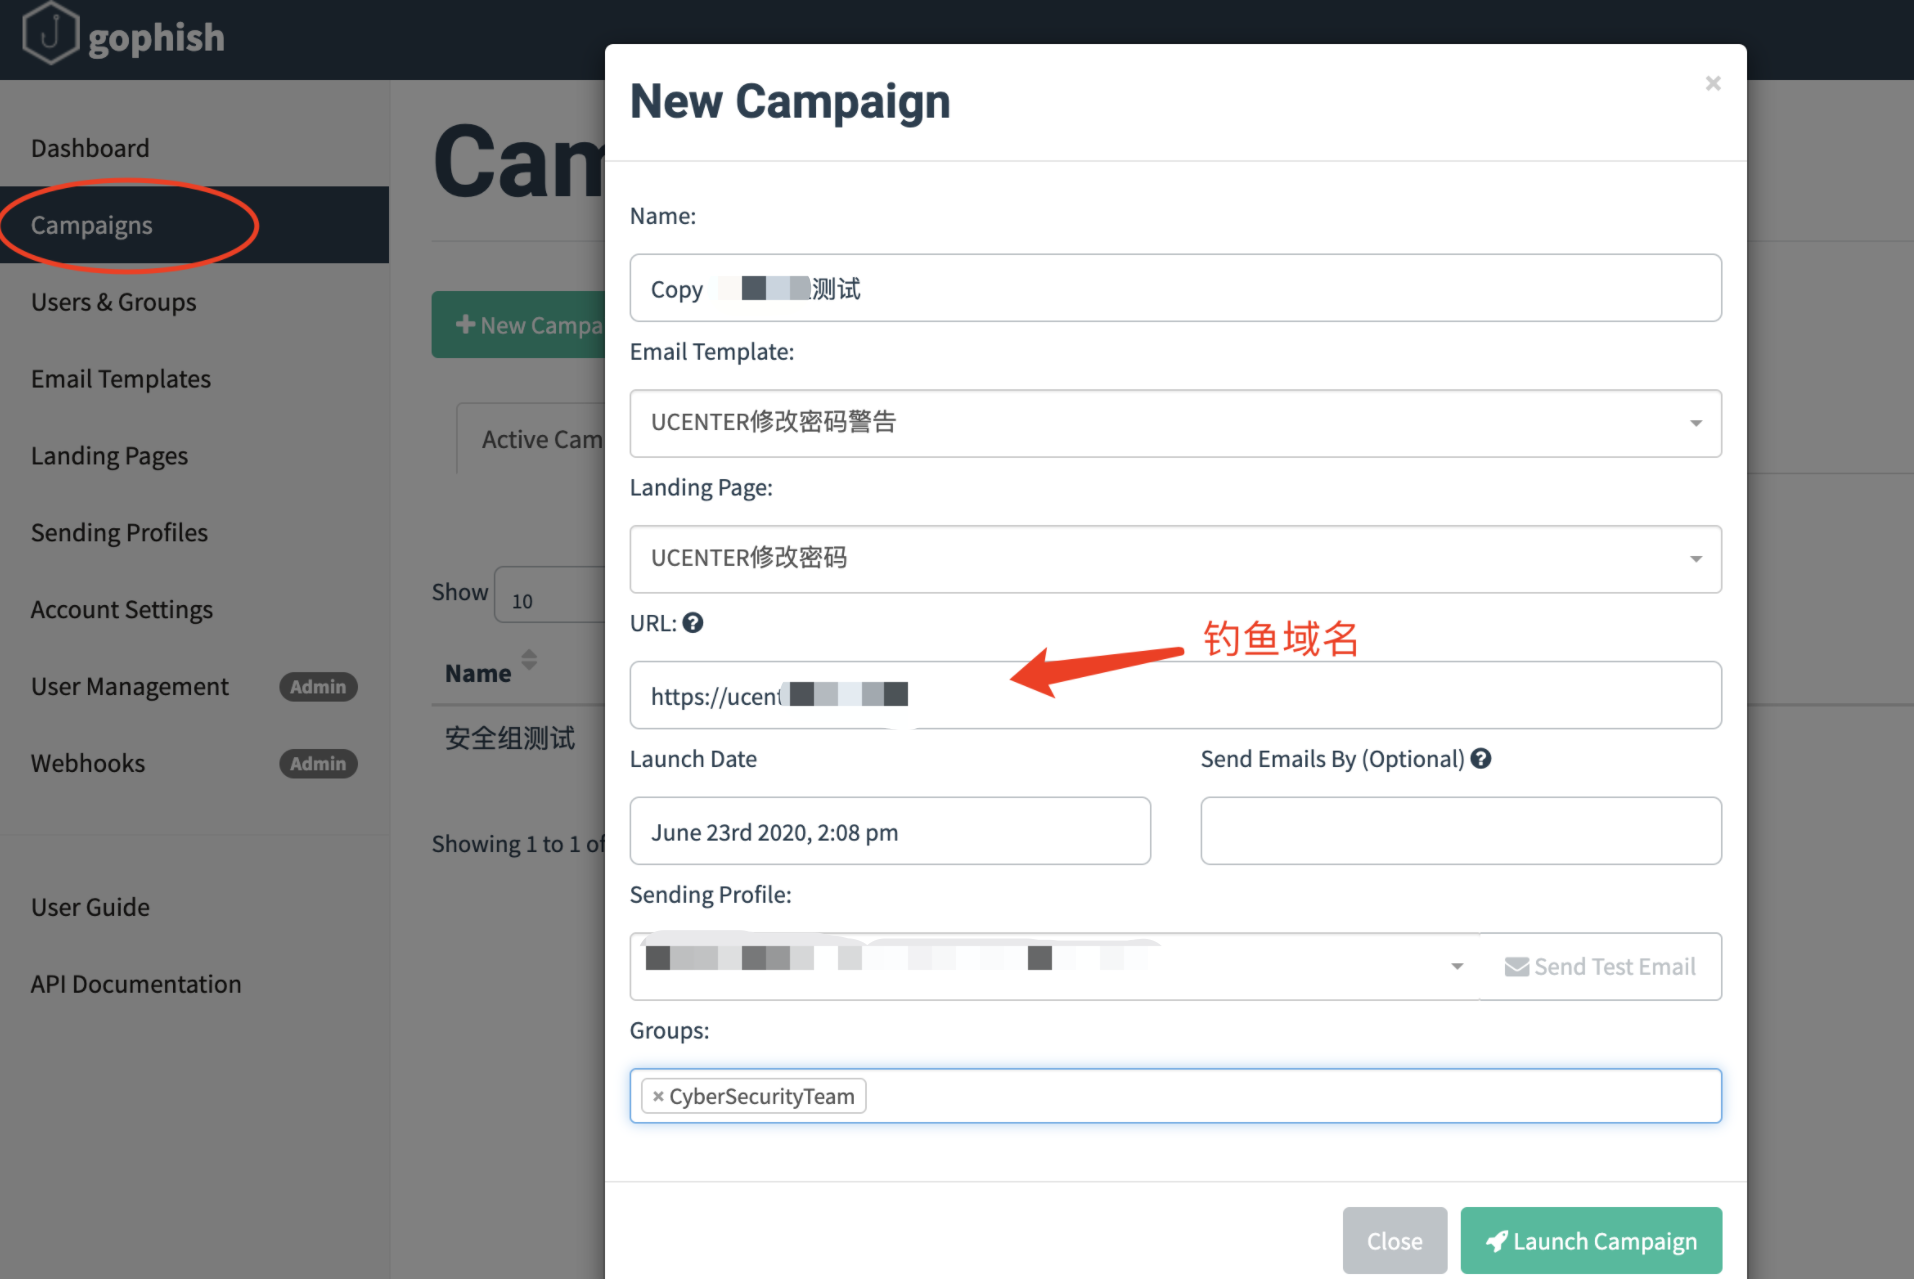
六、发送钓鱼邮件
1、发件配置
选择你创建的模板,输入钓鱼域名URL,程序在每封邮件内容中插入{{.URL}}变量,并创建一个唯一的id,以便跟踪统计。

2、统计面板


3、记录密码

4、重放攻击

七、报表

1、报表类型
- 攻击结果记录
- 带时间线的原始事件记录

2、Goreport
Goreport是一个第三方的报表生产脚本,通过Gophish API可以帮你快速生成IP地址、操作系统、浏览器类型、版本、位置信息列表。并导出为execl或者word文档。
项目地址:https://github.com/chrismaddalena/GoReport
先创建配置文件,写入Gophish API,其他两项没有可以忽略
gophish.config
[Gophish]
gp_host: https://127.0.0.1:3333
api_key: <YOUR_API_KEY>

[ipinfo.io]
ipinfo_token: <IPINFO_API_KEY>

[Google]
geolocate_key: <GEOLOCATE_API_KEY>
基本用法
python3 goreport.py --id 20 --format excel
程序会自动从接口 https://localhost:3333/api/campaigns/20/?api_key=key 获得统计内容,并将结果输出到xlsx/csv/word文件。
一次可以导出多个结果ID的统计报告
python3 goreport.py --id 20,21-25,88 --format csv
合并多个报告
python3 goreport.py --id 20,21-25,88 --format excel --combine
效果如图:


八、其他
项目地址:https://github.com/gophish/user-guide/
用户指南:https://docs.getgophish.com/user-guide/
接口文档:https://docs.getgophish.com/api-documentation/